How to use the image compressor
Step 1 — Add your images
Drag them in, click to browse, or paste a screenshot with Ctrl+V. Several at once is fine — they are processed one after another and listed separately. JPG, PNG, WEBP, GIF and BMP all work.
Step 2 — Say what you need
Hit a file size is the one most people want: type a number in kilobytes, or tap 20 KB, 50 KB, 100 KB and so on. Choose a quality is the classic slider, for when you care about how it looks rather than what it weighs.
Step 3 — Pick the format
JPG is smallest and works everywhere. WebP is smaller still and keeps transparency, but is a poor choice if the file has to open in older software. PNG stays lossless, which means it can only be made smaller by reducing the pixels.
Step 4 — Allow resizing, or don’t
Leave resize if that is the only way ticked and a very small target is reached by shrinking the picture once quality alone has run out. Untick it to keep the dimensions exactly and accept whatever size that gives.
Step 5 — Press Compress
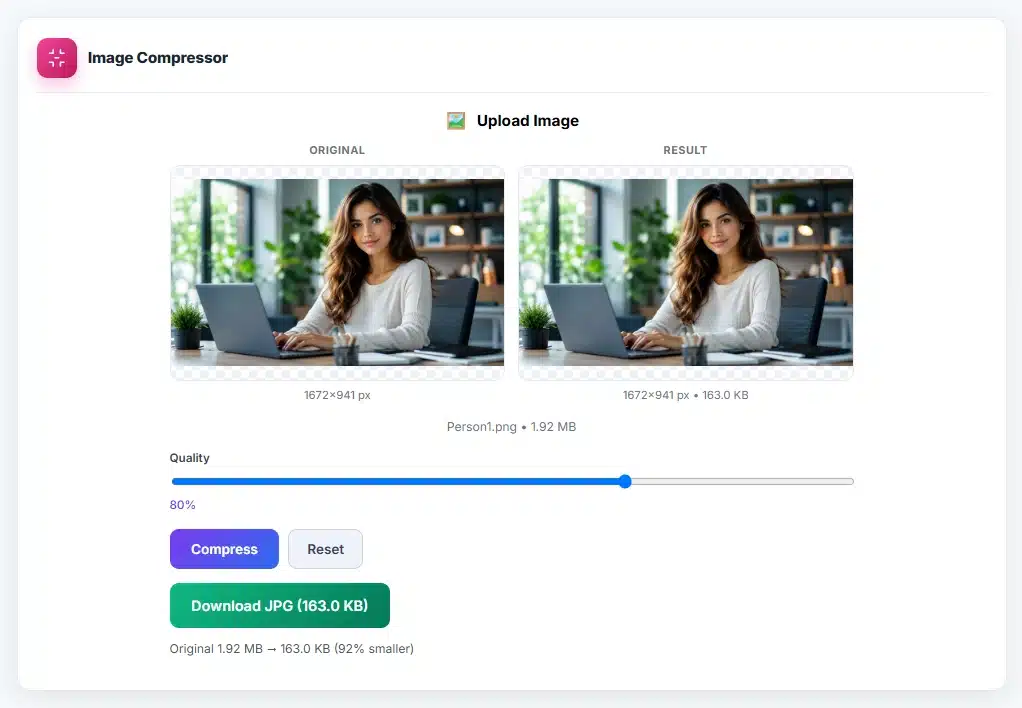
Each image is listed with its old size, its new size, the percentage saved and a thumbnail of the actual result. If the target could not be reached, it says so and gives you the closest it managed rather than pretending.
Step 6 — Download
Save each file individually, or use Download all — the files are saved a moment apart, and your browser may ask permission the first time it sees several downloads in a row.
About the image compressor
This tool reduces the file size of JPG, PNG and WebP images and shows the before and after figures so you can see exactly what you gained. It does two quite different jobs: making web pages load faster, and squeezing a photograph under the file-size limit of an upload form. The second is where people get stuck, and it is what the target-size mode is built for.
Nothing is uploaded — and that is the point
Your images never leave your device. They are read by JavaScript, redrawn onto a canvas inside this page and re-encoded there, which has three consequences worth knowing:
- Privacy. Identity documents, signatures, medical scans and unreleased artwork can be compressed here without any of it being transmitted or stored anywhere.
- No size limit. There is no upload cap because there is no upload. The practical ceiling is your own device’s memory.
- Metadata is stripped. Re-encoding discards EXIF data, including the GPS coordinates most phones record. That is usually what you want before posting a photo publicly — but if you need the camera settings preserved, keep your original.
Hitting a specific size — 20 KB, 50 KB, 100 KB
This is the most common reason people arrive here, usually because a form insists on it: exam applications, government portals, job sites and passport uploads all cap the file at a fixed number of kilobytes and reject anything larger.
Type the number and the tool finds the answer for you. There is no fixed quality setting that produces a given file size — the relationship is different for every image, because a photograph of foliage compresses nothing like a flat logo. So the tool encodes your image repeatedly, narrowing in on the highest quality that still fits under your target: eight passes, which is enough to land within a fraction of a percent.
It always lands under the target, never over, because a form that asks for 100 KB means 100 KB or less.
When quality alone is not enough
Ask for 20 KB from a 12-megapixel photograph and no quality setting will get there while it stays 12 megapixels — and the settings that come close produce a blocky mess. The fix is fewer pixels: halving the width and height removes three-quarters of them, and file size follows roughly in proportion.
That is what the resize option does. Once the quality search has bottomed out, the tool steps the dimensions down 15% at a time until the target is met, and tells you what it ended up at. There is a floor at 120 pixels on the long edge — below that an image is no longer usable for anything, so it stops and reports the miss instead of grinding on.
The practical rule: resize first, then compress. A 1,000-pixel-wide image at quality 80 looks far better at 40 KB than a full-resolution one crushed to quality 20 to reach the same figure.
What the quality numbers mean
In quality mode the slider runs from 10 to 95 and starts at 75. The relationship between the number and the file size is steeply non-linear:
| Quality | Typical size vs original | Visible effect |
|---|---|---|
| 95 | Often larger than the source | None — and wasteful |
| 90 | about 50% | Indistinguishable |
| 85 | about 35% | Indistinguishable at normal viewing |
| 75 | about 25% | Slight softening in fine texture |
| 60 | about 15% | Banding visible in skies and gradients |
| 40 | about 8% | Obvious blocking; last resort only |
Skies, skin tones and smooth gradients show damage first, because they are made of the gentle transitions JPEG approximates most aggressively. Foliage, crowds and texture tolerate much lower settings before anything shows. Screenshots and images containing text are the worst case — sharp edges are exactly what JPEG handles badly, so use PNG or WebP for those.
Choosing a format
- JPG — smallest for photographs, understood by everything, no transparency. A transparent PNG saved as JPG gets a white background, which the tool fills in deliberately; without it, transparent areas would come out black.
- WebP — typically 25–35% smaller than JPG at the same visual quality, and it keeps transparency. Every current browser supports it; some older desktop software still does not.
- PNG — lossless, so quality settings do nothing at all. The only way to make a PNG smaller here is to reduce its dimensions, and the tool says so on the result rather than quietly resizing.
Compression is permanent
Everything discarded is gone. Compressing an already-compressed JPG compounds the damage, and each round makes the next one worse, so always work from the original file rather than from something you have put through this tool before. If a result comes out larger than what you started with — which happens when a small flat graphic is re-encoded as JPG — the tool tells you, and the right answer is to keep your original.
Where this fits with the other tools
To change dimensions rather than file size, use Image Resizer, or Social Media Image Resizer for platform-exact sizes. Image to WebP and Universal Image Converter handle format changes on their own, Reduce Image DPI covers print requirements, and Image Colour Picker reads colours out of a picture. For documents rather than images, PDF Compressor is the equivalent.
Frequently asked questions
How do I compress an image to 20 KB?
Choose Hit a file size, tap 20 KB or type 20, and leave resizing allowed. The tool finds the best quality that fits, and shrinks the dimensions only if it has to. Most photographs need to be resized to reach 20 KB, and the result will tell you what size it ended up.
Is my image uploaded to a server?
No. Everything happens inside this page, on your own device. Nothing is transmitted, nothing is stored, and closing the tab discards it all. That is also why there is no file-size limit and no queue.
Can I compress several images at once?
Yes. Add as many as you like — they are processed one after another with their own before-and-after figures, and Download all saves the lot.
Why is my compressed file bigger than the original?
Because JPG is a poor fit for flat graphics, logos and screenshots — the format is built for photographs, and forcing a simple image through it can cost more bytes than it saves. The tool flags this when it happens. Try PNG or WebP instead, or keep your original.
Will compressing reduce the image dimensions?
Only if you let it. Dimensions are preserved unless the target size cannot be reached any other way and you have left resizing ticked, or unless you set a longest-side limit yourself. Any resizing is reported on the result.
What happens to a transparent PNG?
Saved as JPG, the transparent areas are filled white, because JPG has no transparency at all. Save as WebP or PNG to keep it.
Why can I not compress a PNG very much?
PNG is lossless — it stores every pixel exactly, so there is no quality dial to turn. The only lever is the number of pixels. If you need a big reduction, save as JPG or WebP instead.
Does it remove EXIF and location data?
Yes, as a side effect of re-encoding. Camera settings, timestamps and GPS coordinates are all discarded. Useful before publishing a photo; something to be aware of if you needed that data.
What quality should I use for a website?
75 to 85 for photographs is the usual sweet spot — a large saving with no visible change at normal viewing size. WebP at 80 is smaller again and is the better default for a modern site.
Is there a file-size or daily limit?
No. No account, no email, no watermark, no cap on how many images you compress.
Can I compress a photo for a passport or exam form?
That is exactly what the size presets are for. Those forms typically want 20–50 KB for a signature and 20–100 KB for a photograph, often with dimension rules as well — set the longest side to match what the form asks for, then set the target size.